iOS Native Survey Tiles
If your app is in test mode, you must use a test user. Configure test users in "Test Devices" on the dashboard.
Installation
See here for TapResearch SDK for iOS integration documentation.
Example apps are available here
Before You Begin
- You must be on SDK v3.4.2+ to have access to Native Survey Tiles.
- The wall preview feature needs to be enabled and set up by the TapResearch team so please reach out to your account manager when you are ready to get started
- Native Survey Tiles should be on a dedicated placement, separate from the standard Survey Wall (if applicable)
- Always wait until the SDK is ready (via the
onTapResearchSdkReadycallback or by checkingTapResearch.isReady()) before calling any Native Survey Tiles interfaces - Implement the
TapResearchSurveysDelegatedelegate callbackonTapResearchSurveysRefreshedForPlacementand set it before callinggetSurveys,showSurveyWithSurveyIdorshowSurveyfunctions.
Any other questions? Reach out to your account manager or via Slack and we'll be happy to help!
Introduction
Native Survey Tiles (formerly Survey Wall Preview) let you provide users with available surveys, directly inside your app. Some benefits of this include:
- Custom UI — Create your own UI presentation with survey tiles/cards
- Direct survey access — Provide users with direct entry into surveys they choose
Key Considerations & UI Design
When designing your survey tiles/cards, consider these elements:
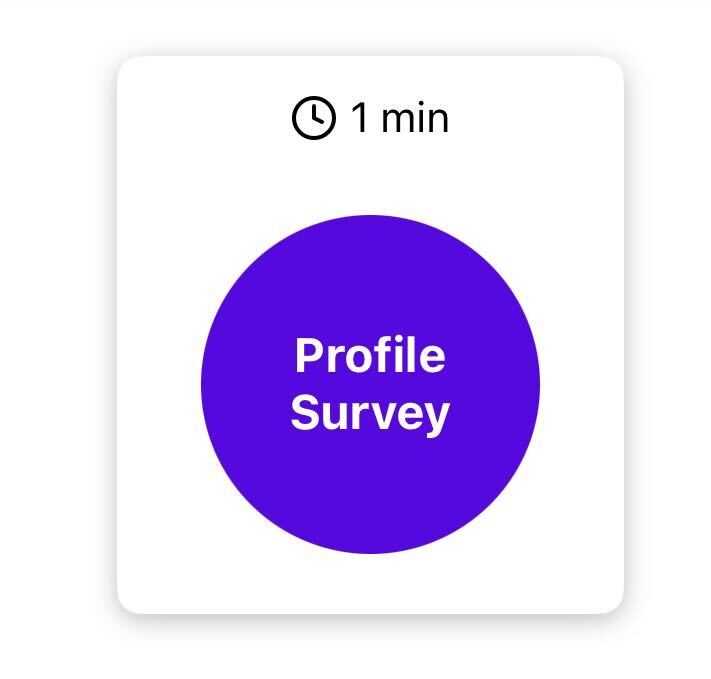
1. The Profile Survey
New users must complete the introductory profile survey before they can access other surveys. For these new users, the SDK will return only this survey until they have completed it.
- Only shown to users that are new to TapResearch
- Will always be returned by itself, with
survey_identifier: 'profile' - Display example:
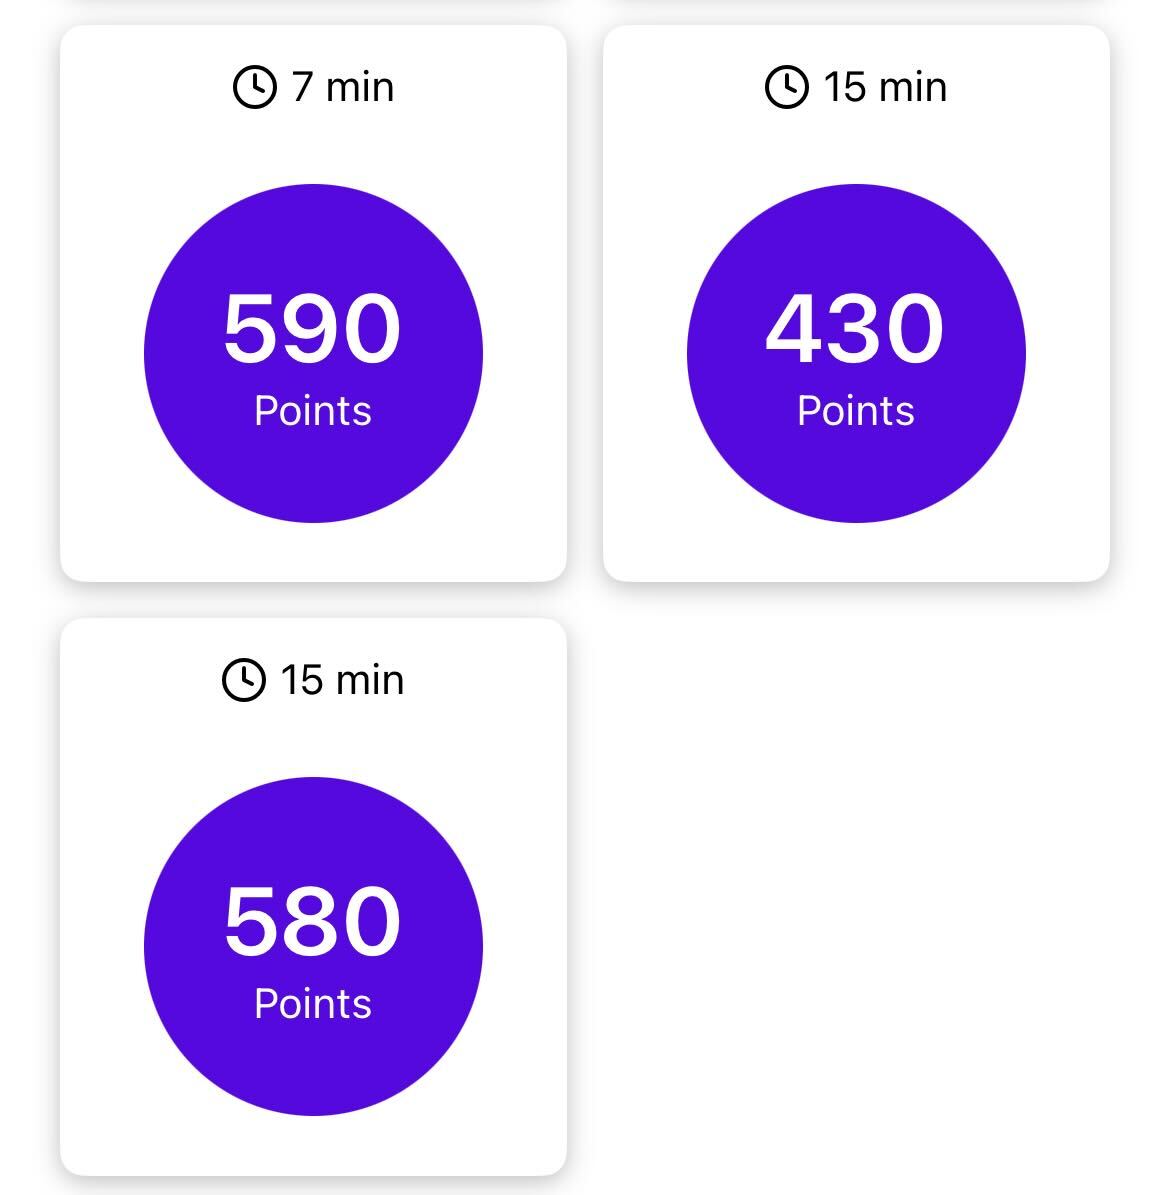
2. Survey Details
After completing the profile survey, users should then start receiving real surveys. Surveys will have the following attributes:
@objc public final class TRSurvey : NSObject, Codable {
// Primary attributes
@objc public let surveyIdentifier : String // Unique identifier, will be used when a user taps on a survey
@objc public let lengthInMinutes : Int // The estimated time to complete the survey
@objc public let rewardAmount : Double // The reward amount for taking the survey
@objc public let currencyName : String // The name of the reward currency
@objc public let isHotTile : Bool // Whether the survey should be designated as a "hot tile"
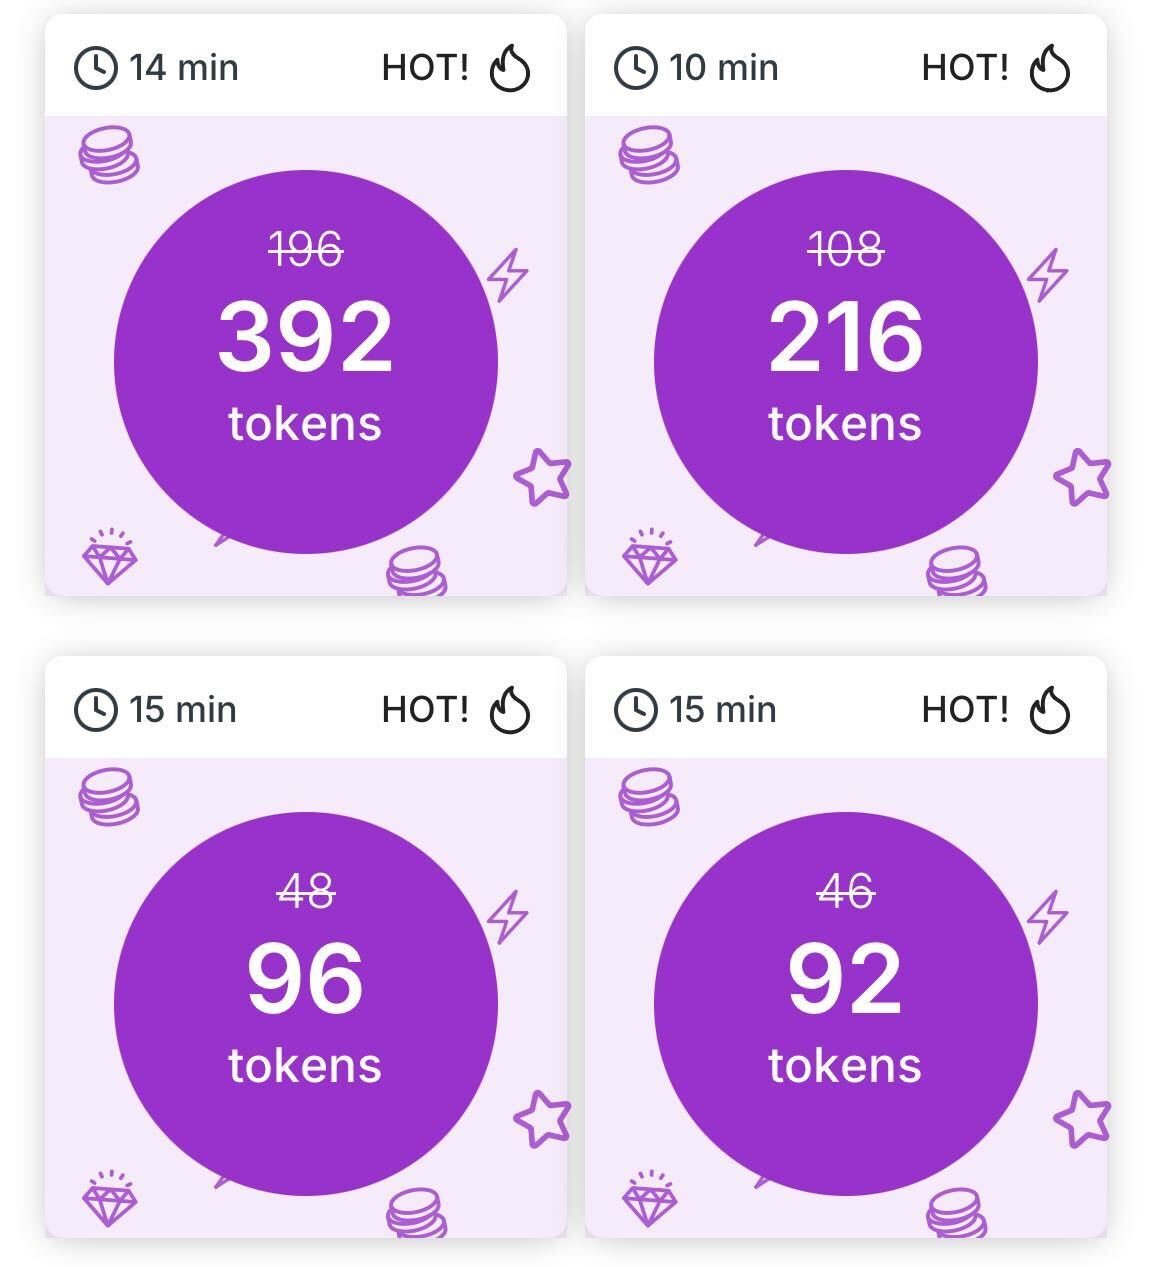
// Sale attributes
@objc public let isSale : Bool // Whether a currency sale is currently active
@objc public let saleMultiplier : Double // The multiplier being applied to the sale
@objc public let saleEndDate : String? // If a sale is active, the UTC date it will end
@objc public let preSaleRewardAmount : Double // The pre-multiplier reward amount, for enhancing UI during a sale
}
- We recommend displaying all primary data points to allow users to choose which survey length/reward they want
- Display example:
3. "Hot" Tiles
Hot tiles are surveys with exceptional scores, typically offering the best time-to-reward ratio. Displaying a special UI highlight for these surveys is recommended, as they tend to increase user engagement and click-through rates.
- Display example:

4. Currency Sales
When running promotional currency sales, the relevant sale attributes of the survey object will populate, allowing you to show enhanced UIs and CTAs to users. We recommend using this data to display the extra rewards boost on the individual tiles.
- Display example:
Integration
SDK Interfaces
Checking for available surveys
When you have received notification that the SDK is ready (see here) you should first check if there are surveys available for your placement:
- Swift
- Objective-C
TapResearch.hasSurveys(for placementTag: <#String#>, errorHandler: <#((NSError?) -> Void)? = nil#>) -> Bool {
}
BOOL hasSurveys = [TapResearch hasSurveysFor:<#(NSString * _Nonnull)#> errorHandler:<#^(NSError * _Nullable)errorHandler#>];
Getting available surveys
Get the surveys for your placement.
Note: Attempting to fetch surveys before receiving the SDK Ready callback will result in an error and no surveys will be returned.
- Swift
- Objective-C
TapResearch.getSurveys(for placementTag: <#String#>, errorHandler: <#((NSError?) -> Void)? = nil#>) -> [TRSurvey] {
}
NSArray *surveys = [TapResearch getSurveysFor:<#(NSString * _Nonnull)#> errorHandler:<#^(NSError * _Nullable)errorHandler#>];
Check that a survey can be shown
Before showing, it is always best to check if the survey can be shown using canShowSurvey:
- Swift
- Objective-C
TapResearch.canShowSurvey(surveyId: <#String#>, forPlacementTag placementTag: <#String#>) -> Bool {
}
BOOL canShow = [TapResearch canShowSurveyWithSurveyId:<#(NSString * _Nonnull)#> forPlacementTag:<#(NSString * _Nonnull)#>];
Showing a survey
Showing a survey works similarly to showContent used for showing TapResearch survey content: after checking if a survey can be shown, call showSurvey with a survey ID, placement tag and a content delegate to receive
onTapResearchContentShown and onTapResearchContentDismissed callbacks, for more information about these callbacks see here.
- Swift
- Objective-C
TapResearch.showSurvey(surveyId: <#String#>,
                       forPlacementTag placementTag: <#String#>,
                       delegate: <#TapResearchContentDelegate#>,
                       errorHandler: <#((NSError?) -> Void)? = nil#>)
{
}
[TapResearch showSurveyWithSurveyId:<#(NSString * _Nonnull)#>
                       placementTag:<#(NSString * _Nonnull)#>
                           delegate:<#(id<TapResearchContentDelegate> _Nonnull)#>
                       errorHandler:<#^(NSError * _Nullable)errorHandler#>];
If you need to pass custom parameters use:
- Swift
- Objective-C
TapResearch.showSurvey(surveyId: <#String#>,
                       forPlacementTag placementTag: <#String#>,
                       delegate: <#TapResearchContentDelegate#>,
                       customParameters: <#[AnyHashable:Any]#>,
                       errorHandler: <#((NSError?) -> Void)? = nil#>)
{
}
[TapResearch showSurveyWithSurveyId:<#(NSString * _Nonnull)#>
                       placementTag:<#(NSString * _Nonnull)#>
                           delegate:<#(id<TapResearchContentDelegate> _Nonnull)#>
                   customParameters:<#(NSDictionary * _Nonnull)#>
                       errorHandler:<#^(NSError * _Nullable)errorHandler#>];
Callback
Native Survey Tiles adds a required callback that lets you know when surveys have been refreshed.
Setting the delegate
Required: Set the delegate using setSurveysDelegate before calling getSurveys, showSurveyWithSurveyId or showSurvey functions.
If the delegate is not set the SDK will send errors using the TapResearchSDKDelegate error callback onTapResearchDidError and Native Survey Tiles will not work.
- Swift
- Objective-C
TapResearch.setSurveysDelegate(_ delegate: <#TapResearchSurveysDelegate?#>) {
}
[TapResearch setSurveysDelegate:<#(id<TapResearchSurveysDelegate> _Nullable)#>];
To remove the delegate call the setSurveysDelegate with nil.
Handling the callback
You will see calls to the callback function when surveys have been completed, after any TapResearch content has been dismissed.
Make sure the delegate object implements TapResearchSurveysDelegate and updates local storage and displays with the updated surveys:
- Swift
- Objective-C
func onTapResearchSurveysRefreshed(forPlacement placementTag: String) {
}
- (void)onTapResearchSurveysRefreshedForPlacement:(NSString *)placementTag {
}